Wednesday, November 23

FRIENDS are ... {MERLY IMPRESSIONS & KAISERCRAFT}

hello scrappy peeps!

HAPPY wednesday and a very successful week to all of you! 

it was my turn over at the MERLY IMPRESSIONS' blog yesterday and i've created a layout featuring the wonderful OOH LA LA collection from KAISERCRAFT and celebrating FRIENDSHIP -

"FRIENDS ARE ..."


OTHERS:


close ups of my project with a few TIPS & TRICKS:

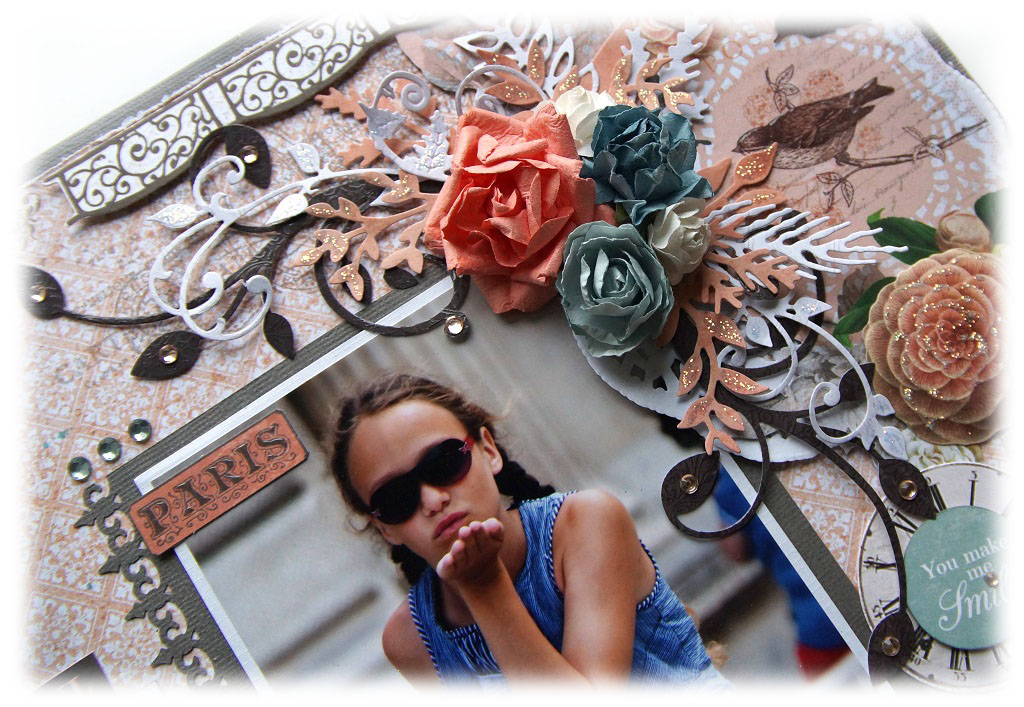
fussy cut butterflies, birds and roses from pattern paper to decorate your page.

TIP! slightly emboss your fussy cut / die cut images before adhering them with mounting foam tape.


add glitter glue - colourless - to the fussy cut flowers to make them sparkle.


use rhinestones and glitter glue to decorate the various die cut images.


THANK YOU for stopping by today!
have a LOVELY week!

hugs 'n smiles,

Thursday, November 17

DELICIOUS {BOBUNNY}

hello scrappy friends!

today i would like to share a layout i've recently created for BOBUNNY social media. it features one of their FALL release collections KISS the COOK.

on the picture is my lovely niece when she was a cute little baby and i believe i found the perfect title for it - 

"DELICIOUS³"


PATTERN PAPER: farm fresh, kiss the cook, quilt, menu / KISS the COOK
6x6 paper pad: KISS the COOK
 noteworthy: KISS the COOK
combo sticker: KISS the COOK
 double dot jewels: CITRUS
cardstock: FRENCH VANILLA double dot
glitter paste: RUBY RED
dies: FANCIFUL, PERFECT PETALS
stickable stencils: LOTS of LOVE
blossoms: NATURAL EARTH PANSY
tools: palette knife assortment pack, soft grip scissors

and here are some more CLOSE UPS and some TIPS & TRICKS on how i did it:

use the stickable stencil with GLITTER PASTE to alter the background paper.


fussy cut the banners from pattern paper, mixed them with some stickers and arrange them to your liking.


use pattern paper to fussy cut the letters for the title.
TIP! use mounting foam tape to adhere your embellishments directly onto the glittery layer. the normal double sided tape doesn't like sticking to glitter paste or other media sometimes :-)


die cut the flowers from pattern paper and embellish them with rhinestones.
TIP! mix brand flowers with home made ones to get more versatile look!


use rhinestones to decorate your embellishments - just as i did with WILLY's name.


i hope you enjoyed today's post!

THANK YOU for stopping by!

hugs 'n smiles,

Saturday, November 12

BEAUTIFUL MOMENTS {kaisercraft & merly impressions}

hello crafty peeps!

just stopping by to share another layout i've created for MERLY IMPRESSIONS' blog featuring the wonderful OOH LA LA collection from KAISERCRAFT {available at MERLY IMPRESSIONS'  online store}.

"BEAUTIFUL MOMENTS"


clear stamp - POSTMARKS
decorative die - MINI FOLIAGE

OTHERS:
STICKLES glitter glue - star dust
RANGER - multi medium GLOSS

here are some close ups of my project with a few TIPS & TRICKS on how i did it:

mix mini paper blooms with larger ones to create the flower cluster.


TIP! add glitter glue and rhinestones to decorate the die cut foliage.


decorate the die cut elements using resin flowers.


TIP! add a layer of multi-medium to give glossy look to some of your images.


i hope i managed to inspire you today!

THANK YOU for stopping by!

hugs 'n smiles,

Friday, November 11

TAKE the MOMENT {INDIGOBLU}

good morning crafty friends! 

i'm just popping by today to share my first project for november over at INDIGOBLU blog. this month the theme is FIREWORKS! and do you know which one was the biggest of them all - the BIG BANG of course!


if you wish to see more close ups and a detailed list of all the products i used creating this card, head over to the INDIGOBLU blog.

have a fabulous weekend!

hugs 'n smiles,


Wednesday, November 9

beyond the page TAG CALENDAR {kaisercraft & merly impressions}

hello crafty peeps!

today i'm over the moon! i finally received my copy of the last magazine i was published in - SIMPLY CARDS & PAPERCARFT #156 - 


did you see my TAG CALENDAR sitting pretty on top of the title?


you can find all the products necessary to complete this project at MERLY IMPRESSIONS online store.

and there is a step-by-step picture tutorial in the SIMPLY CARDS & PAPERCARFT #156 magazine.

here are some close ups from my project:


i hope you enjoyed my post today!

and if you haven't got your copy issue #156, make sure you do, because the cover gift is amazing and the magazine, as always, full with lovely ideas!

hugs 'n smiles,