Wednesday, November 30

SHE {DT work for heartfelt creations}

hello scrappy friends!

another wednesday, another heartfelt creations project to share with you! this week i decided to use ELLEN's pictures on my layout.


i used the following heartfelt creations products on this layout:

begin by creating a decorative edge on a sheet of pattern paper. i used the WONDERFUL "PANSY" punch around the page set from martha stewart. then i stitched the pink border under the decorative edge. 


the two different colored stripes are made with EK SUCCESS "abstract flower" edge punch.

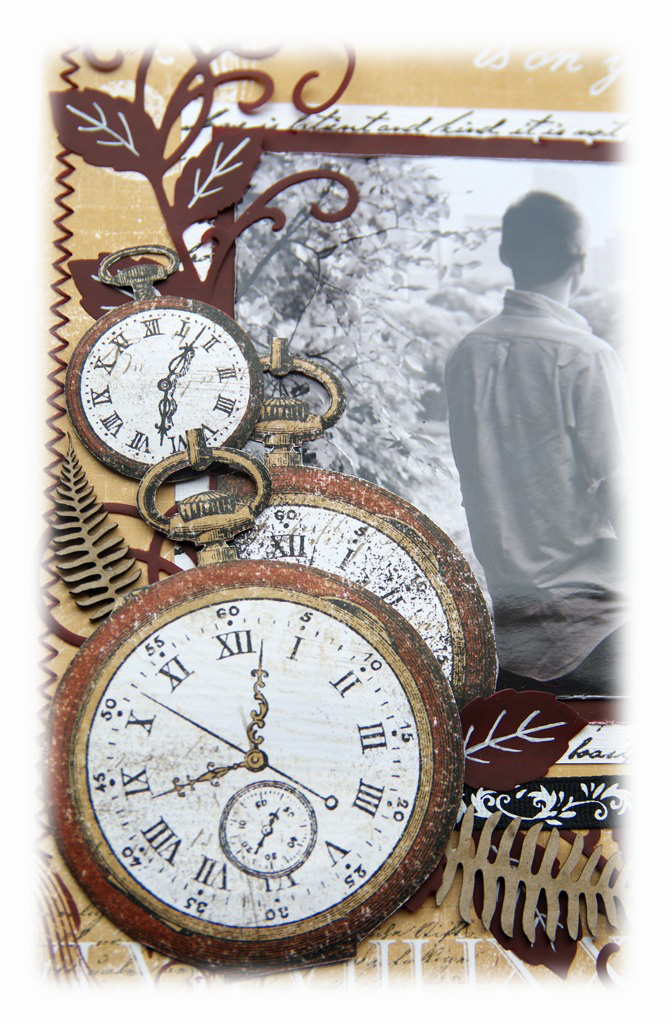
to create the frames around the pictures i used the HC decorative window scene die. i cut one of the frames in two and placed them under the pictures.


i stamped the largest flower from the HC flora grande 1 precut set on the pattern paper with green ink. then, i stamp the other sizes on different color pattern papers with brown ink to create the big blossom. for more detailed explanation on how i did this flower, please click HERE.


i stamped the flourish with leaves from the HC bella rose leaves stamp set on a green cardstock and i cut it with the HC bella rose die. using the smallest flowers from the HC posy patch flowers precut set and the HC posy patch die, i created the small pink flowers. i added small brads and attached them to the background paper.


finishing touches - i added a piece a green ribbon on top of the punched paper borders and another piece of ribbon – next to one of the pictures. the sentiment at the bottom right corner comes from the HC classic messages precut set.


i doodled around the paper borders and wrote the joournalling with my FAVOURITE white pen.


 finally, i attached the pattern background paper on 12" x 12" brown cardstock to finish off my page. 

i hope you enjoyed my LONG instructions!
make sure to go and check my newest tut on how to create a paper blossom with HC stamps HERE.

have a creative week!

hugs 'n smiles,
Emmy

flower tutorial using the hc flora grande precut sets

hello scrappy friends!

as i promised i'm sharing a little tutorial on how i made the big blossom for my latest hearfelt creations.


here is a list of what you will need to make such flowers:
brown ink pad
stickles diamond glitter glue
pearl brads
3d foam tape
double sided adhesive tape

step 1: stamps one of each of the 4 different floral designs {i didn't use the biggest stamp for this blossom}; 3 of them should be on pink pattern paper and the largest one - on brownish pattern paper; cut them out and separate the individual petals;


step 2: curl the petals down {i used my pencil for the large flowers and a barbecue stick for the smaller ones - i'm sure that there are better tools, but just didn't have anything at home}; your petals will look like this when you are done shaping them: 

step 3: turn your flowers around and start attaching the double sided adhesive tape {one small piece in the middle} and the 3d foam squares under the petals; add two-three layers of foam tape under the petals, if necessary, to achieve the desired dimension; 

step 4: take your pearl brad, push it through the hole in the florals center and attach it on the back side; you blossom should look like this now: 


step 5: add some glitter glue and your flower is complete!


the whole process doesn't take more than 10 minutes and the effect is stunning!


i hope this tutorial was useful to you!


keep creating!


hugs 'n smiles,
Emmy

Monday, November 28

baby rudolph {DT work kaboodle doodles}

good evening scrappy friends!

i have an amazing news to share with you and a brand new layout today!

so, the news -
i've been invited to join the AMAZINGLY TALENTED kaboodle doodles design team! YAY! 


and the layout -
this week challenge at kaboodle doodles is themed "bundle up for winter" and here is some inspiration from me:


"baby rudolph"

on the pictures is my little baby THEO, bundled up for winter in his RUDOLPH outfit. isn't he ADORABLE?

i used the cutest MY MIND'S EYE collection "i believe". the sweet reindeers and the soft colour palette reminds me of little babies bundled up under the christmas tree. honestly, i cannot imagine a better paper line for my pictures.

for my embellishments i used the matching stamp set - rudolph with his shiny nose:


the christmas wreath - i added stickles red glitter glue to create the berries:


 and the cute little robin birds of course:


the WONDERFUL snowflakes are from k & company:


i used also PRIMA marketing stamps {the notes on my background}, inkadinkado stamps {the snowflakes and the reindeers} and making memories stamps {the sleigh}:


and, of course, there can be no christmas layout, without the christmas flower:


if you need more inspiration for this challenge, visit kaboodle doodles blog for the AMAZING examples of our design team.


rules for play:
  • we will post a challenge every monday. all entries must be submitted by 5:00 pm MST (Mountain Standard Time US) on the sunday before the next challenge is posted;
  • you do not have to use digital products, unless the challenge calls for it;
  • your creation must be new and never posted; you can create anything your heart desires (card, layout, altered item, etc.) just as long as it fits the challenge theme or sketch;
  • please use our link tool and link DIRECTLY to your challenge entry; any links that do not link directly to the challenge post will not be considered;
  • for those who do not have blogs, you can post your creation to any online gallery, but if that's not possible, you can email it to kaboodle doodles team.


the prize:
this week's challenge sponsor is stamp-n-doodle:


i look forward to seeing your creations for this week's challenge. and don't forget - the projects need to be posted by sunday, december 4 and the winners will be announced on tuesday, december 6.

hugs 'n smiles,
Emmy

Friday, November 25

LOVE {DT work for heartfelt creations}

hello scrappy friends!

today i want to share with you a layout i made for heartfelt creations using the newest addition to their WONDERFUL products - the artistic gatefold collection. the artistic gatefold collection is ABSOLUTELY stunning and genius. you can create decorative gate-fold cards, doilies, borders, the possibilities are endless.


i named this layout "LOVE"

HEARTFELT CREATIONS products used:
HCPC 3436 rye grass flourish presut set
HCPC 3440 vintage door precut set
HCPC 3435 feather grass flourish precut set
HCPC 3437 carnation florals 1 precut set
HCPC 3438 carnation florals 2 precut set
HCPC 3390 bella rose leaves precut set
HCD 712 bella rose die
HCD 716 layered elegant swirl die

other products: kaiserkraft “chanteuse collection” papers; sew easy, DMC stranded cotton, white and green cardstock, american crafts “valentine” ribbon; ZVA creative white pearls; glimmer mist “pink bubblegum”; martha stewart deep edge punch “garden gate trim”; liquid pearls “white opal”

prepare a white cardstock, a bottle of a pink bubblegum glimmer mist and a PRIMA marketing mask. using those products, create the central masked pattern on the white cardstock and stamp the corners with the rye grass flourish precut stamping set. complete the frame by connecting the corners with brown stitches.


using the door frame stamp from the vintage door precut set, create a smaller frame on a piece of pattern paper and glue your picture on top of it. add an extra layer of green cardstock under your picture.

use the layered elegant swirl die to create a doily from brownish pattern paper.


 cut it in two {opposite direction} and position it under your picture. punch a stripe with the garden gate trim deep edge punch from purple pattern paper, add some ribbon and your layers are complete.


for the flourish – stamp different size flowers on patter papers; cut and emboss them; arrange your blossoms and stitch them together, while adding a few beads. you can stick foam squares under your petals to add extra dimension to your flowers.


stamp the flourish with leaves from the bella rose leaves stamp set and the pointy leaves from the carnation florals stamp set. cut them out, emboss them and begin arranging the flourish on the side of the picture.


using the layered elegant swirl die cut two small elements and arrange them around the top right picture corner. outline the heart with liquid pearls.


stamp the word LOVE with the feather grass flourish stamp set and color it with copic ciao pink marker.


add little liquid pearls dots around your elements to finish off the layout.

if you wish too see more examples, created with the FABULOUS artistic gatefold collection, go to the heartfelt creations blog.

details: this collection features 6 new precut stamp sets that coordinate with the existing spellbinders carnation creation shapeabilities and 2 new exclusive dies.

but wait - there is more:

BLACK FRIDAY SPECIALS

purchase the entire artistic gatefold collection on black friday and SAVE $25. all domestic orders placed on black friday recieve FREE SHIPPING. shop with us on black friday and your hobby feeds a hungry child!

sponsorship details: HEARTFELT CREATIONS will be donating 10% of all black friday sales towards CHILDCRY, a non-profit feeding organization. click HERE to view all the details.

and more: 

leave a comment on the heartfelt creations blog by november 29 for a chance to win the entire release valued at $150. the winner will be announced on the HC blog on november 30.

it is a bit long post, but i hope you enjoyed it!

have a great weekend everyone!

hugs 'n smiles,
Emmy

Tuesday, November 22

scrapbook challenges giveaway!

hello scrappy friends!

i have a GREAT NEWS to share with you today!

everyone who is signed up to receive the scrapbook challenges newsletter by 11:59 p.m. PST on november 25th will be entered to win the merry christmas collection pack from echo park ♥


all you have to do is to click here and sign up to receive out monthly news and announcements!

hugs 'n smiles,
Emmy

Sunday, November 20

TIME is on your side {DT work for heartfelt creations}

hello lovely friends!

 here is a project i made exclusively for heartfelt creations using their AMAZING products. i named it "TIME is on your side": 


to create this layout i used the following heartfelt creations products:

other: bo bunny timepiece paper collcetion, sew easy, DMC stranded cotton, white cardstock, burgundy paper, dusty attic “ferns” die cut chipboard, prima marketing pearls, rayher black/white ribbon set, papermania burgundy floral ribbon set, white buttons.

and here is how i did it:
begin with the timepiece paper sheet from the BO BUNNY’s “time piece” collection. using SEW EASY, create a zigzag pattern along the sides and stitch it with DMC stranded cotton. take a piece of a white cardstock {15 x 20 cm} and stamp it with the large elegant word background precut set and black ink. cut a basis for the picture from the burgundy paper {14 x 19 cm}. distress the edges with Tim Holtz distressing tool. Distress the edges of the picture and attach the tree layers {picture, burgundy paper and white cardstock} together with double sided adhesive type.
position your picture on the background sheet of paper. carefully cut around the bicycle and stick the picture behind it.


die cut two swirls with leaves with the bella rose die and one corner and one border element with the decorative butterfly / border die from the burgundy paper.

die cut another border from the white cardstock. attach to two borders together {burgundy colour on top} with double sided tape. add a stripe of stamped white cardstock and a piece of black ribbon. attach the decorative element to the right top corner of your layout. embellish it with two white buttons.


cut the swirls into pieces and arrange them around your picture. cut different size clock images from the tick tock paper sheet from BO BUNNY’s timepiece collection and add them around the picture too. add two of the dusty attic ferns and a piece of any black & white ribbon. with a white ball pen draw a leaf pattern on the die cut leaves and a frame around the decorative corner.


adhere your title and write the sub-title by hand, using the white ball pen. stamp the word BELIEVE with black and brown ink on a side of the picture.


 Add some burgundy zigzag ribbon and white pearls to finish your layout.


i hope my little step by step tutorial was useful to you. and don't forget to check out all the WONDERFUL projects in the blog post at heartfelt creations! there some FABULOUS examples created by our talented design team!

keep creating!

hugs 'n smiles,
Emmy

Saturday, November 19

marianne design 1000 followers blog candy

hello lovely friends!

today i have a fantastic news to share with you  - the is an AWESOME blog candy from marianne design on their blog


this time they give an extra grand prize as they have reached 1000 followers. to celebrate this marianne is donating a huge prize to one lucky winner:


what you have to do to be eligible for this price: 
- add your name on the link tool under marianne's blog post
- be a follower of the challenge blog
- add the candy logo at the top at your own blog

pretty easy, right?!
good luck to all of you who decide to play along!

hugs 'n smiles,
Emmy

Tuesday, November 8

my memories suite {a digital scrapbooking software} giveaway!

hello scrappy friends!

i have an AMAZING news to share with you today - few days ago liz gardner from my memories contacted me to review their newest digital scrapbooking software "my memories suite". i have to admit - her timing was perfect! 


i'm going on a family visit to bulgaria {my home country} next week and i'm really stressed. every time i go back, i keep promising my friends and family to bring pictures and layouts... but i never have enough time to sort out the digital mess on my hard drive! 

i've been piling up photos and ideas since my children are born, but printing them on paper was always tricky. and finding the right pictures to present to the grand-parents... almost impossible! 

since i'm playing with my memories suite digital scrapbooking software my life is much easier. i'm able to create a layout in less than an hour - it is THAT simple to use. this scrapbook software comes with hundreds of digital papers, embellishments and templates, and there is something for every taste and every occasion. 

the best part is that you can create a various range of projects with my memories suite digital scrapbooking software -12 x 12 {8.5 x 11} scrapbook pages, interactive photo album {which you can put on DVD that will automatically play on any computer}, print custom made albums, calendars, cards,etc. you can share your projects online, you can add music and notes to your layouts and re-view them later on your ipod, PC or MAC.

here is a sneak peak of some of my projects, creates with my memories suite:


and here is the BIG SURPRISE - my memories are offering one my memories suite digital scrapbooking software for FREE! isn't that AMAZING?!

here is what you have to do:
  • become a follower on my blog, then visit my memories website, and in a comment below, tell me which digital scrapbooking kit is your favorite {one entry}
  • like my memories on facebook***; leave a comment below with your facebook name to let me know you’ve done it {extra entry}
  • follow my memories on twitter; leave a comment below to let me know {extra entry}

***please note, when my memories facebook page gets to 10,000 fans they are giving away an iPad!!! all you have to do is LIKE thier page to be eligible to win!

make sure to leave a comment for each one!

but WAIT - there is MORE:
visit my memories website and use coupon code STMMMS79323 and you’ll save $10 discount off the purchase of the my memories suite digital scrapbooking software and get another $10 off products in the my memories store.

you have until 20th of november 2011 to enter this contest. i'll announce the winner on the next day {20th december 2011}, using random.org. so, make sure to come back then.

keep creating!

hugs 'n smiles,
Emmy

Friday, November 4

cuddly buddly challenge 19: a recipe card!

hello cuddly friends!

it's friday again and it is time for another AMAZING challenge at cuddly buddly. this week we challenge you with a recipe - create a card with 3 flowers, 2 buttons and 1 ribbon.

here is some inspiration from me:


i used the AMAZING karen middleton digi stamp "star fairy", PRIMA's roses, petaloo white flower and marianne design "traditional christmas" paper pack.

you can find more FANTASTIC examples of our DT on cuddly buddly's blog.

rules for play:
  • you may enter as many times as you’d like to each week so long as your project hasn't been submitted to a previous challenge at cuddly buddly;
  • you may submit your entry to other challenges across the web;
  • you will need to publish your entry on your own blog with a link to the challenge post and also display one or more of cuddly buddly's web buttons from the column on the right;
  • NEW! – cuddly buddly customers who’d like to join in and play along but don’t have a blog can now do so by emailing their entry to KIM. your entry will then be displayed in the customer gallery. ONLY cuddly buddly artists’ images can be entered by email please!
  • link your project to cuddly buddly by submitting your entry using the inlinkz service at the bottom of each challenge blog post;
  • entries need to be linked up before 20:00hrs GMT thursday 10th november.

the prize:
a £10 (or £5*) cuddly buddly crafts gift certificate to be spent as the winner/s so choose in the online shop.

* if the winning entrant has not used a cuddly buddly image they will receive a £5 gift certificate.

the winner/s:
one winner will be chosen at random from all of the entries. if there are over thirty entries the DT member who set the theme for the challenge will personally choose a second winner.

the winner/s will be notified by email, announced on the next challenge and listed on the winners page.

come and join the FUN at cuddly buddly!

hugs 'n smiles,
Emmy

Thursday, November 3

november's prima product pick

hello, scrappy friends!

i just saw the november's PRIMA palette and product choices and i LOVE them all! they inclused some of their best scrappy goodies ever!

Just take a peek at the vintage beauties below:


for more inspiration and ideas, you can visit PRIMA's blog.

hugs 'n smiles,
Emmy