Tuesday, September 30

our fairytale {MERLY IMPRESSIONS & KAISERCRAFT}

hello scrappy friends, 

i've got a brand new layout to share with you today. 
i designed this one for MERLY IMPRESSIONS using the amazing KAISERCRAFT "something blue" collection.

if you have followed the MERLY IMPRESSIONS' blog {and mine}, probably you’ve noticed that so far i used the black/white colour palette from this collection, the blue/black palette and today i’m sharing a page created with the brown/beige papers.

it is one paper line, but the possibilities are endless! 

"OUR FAIRYTALE"


for my background i used the true love pattern paper. i didn't alter it further, because i really like the design on it – the rhyme is so sweet and perfect for the wedding pictures i used.

to create the cardstock edge with the large hearts i used MARTHA STEWART deep edge punch "scroll heart" and KAISERCARD vanilla cardstock. i added a second layer with a piece of lace from the cream lace package and finished off my design with a stripe of pattern paper from the 6.5 x 6.5″ paper pad matching the collection.


i die cut the paper bow using TIM HOLTZ "bow-tied" decorative strip die.

 for the lovely blossoms i used KAISERCRAFT paper blooms coral. i needed two packages to get all the similar flowers, but i believe that it is worth it! these blooms are simply amazing! 


i added a bit of RANGER liquid pearls white opal to decorate the petals. for the smaller flowers, i used KAISERCARD vanilla cardstock. i cut the stripes and created the buds by hand.
to finish off my flower clusters i added die cut foliage and KAISERCRAFT pearls lush colour.

for my title i used a die cut from the collectables pack.


and for my sentiment i used again a die cut from the collectables pack, but this time i layered it on patter paper from the 6.5 x 6.5″ paper pad.


 i hope you enjoyed today’s post!

have a fabulous day!

hugs 'n smiles,

Monday, September 29

SEPTEMBER creations with DIE-VERSIONS

hello crafty friends! 

i've got a few cards to share with you today, which i created with the wonderful dies from DIE-VERSIONS

for the first card i mixed our latest CHRISTMAS IN JULY release with a SWEET WORDLETS seasonal die: 

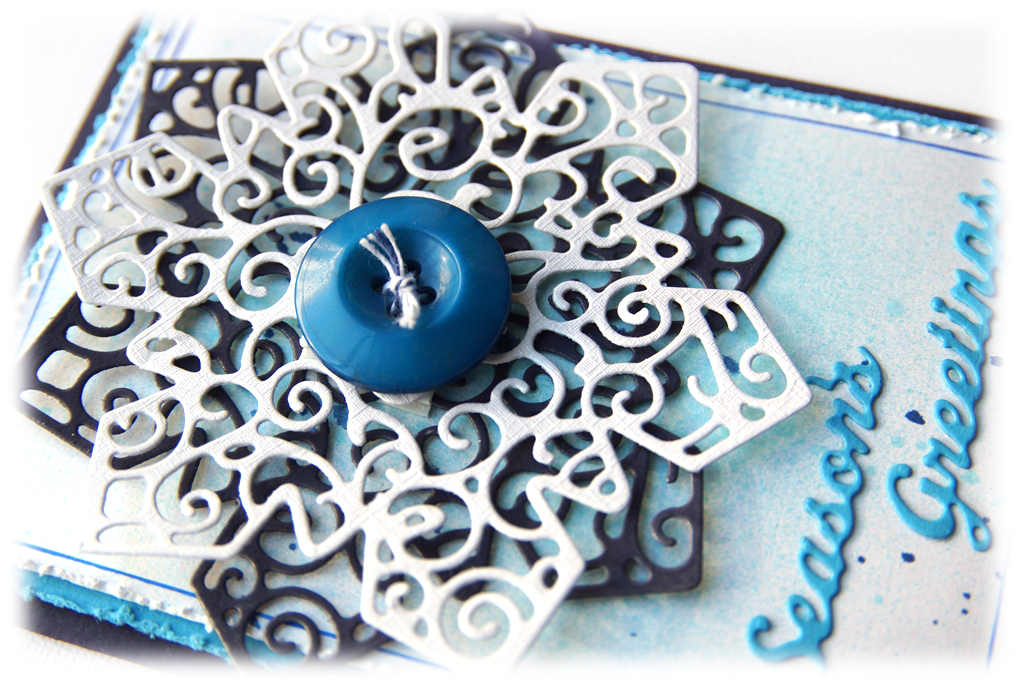
how i did it: to mat the ruffled light blue cardstock panel i used a 10 x 15 cm dark blue card base. then i sprayed the white cardstock panel (9 x 14 cm) with a light blue paint spray and spattered some dark blue paint on it. when the paint has dried, i doodled the frame and adhered the ready panel to the card base. 


 to create the large snowflake i used DV whispers die "delicate snowflake". i die cut the snowflake from dark blue and from white cardstock, and adhered it to my card using mounting tape. to finish off my design i added the blue button in the middle. 


 for my title i used the sweet wordlets "seasons greetings" die. i adhered it to the card using a glue pen - it is really handy with small details.

*****

for my second card today, i used the two exactly the same dies, but the effect is completely different:

i used a red card base this time, which i mat with a layer of white cardstock and a layer of pattern paper. to decorate the card front i added the dotted edge using RANGER liquid pearls "white opal".


 to create the half glittery snowflake i used DV whispers die "delicate snowflake". i adhered a double sided tape to a white cardstock, die cut the snowflake, then i removed the second protective layer and sprinkled white glitter on it.


my title i die cut with the sweet wordlets "seasons greetings" die.

as you can see - you can use one and the same die over and over again, and depending on the papers you use and the style you are trying - the effect is always wonderful and unique!

i hope i managed to inspire you today!

have a fabulous week!

 hugs 'n smiles,

Wednesday, September 24

HEARTFELT CREATIONS and CREATIVE EMBELLISHMENTS cross promotion

hello crafty friends!

i've got a fabulous news to share with you today - we've {CREATIVE EMBELLISHMENTS} have teamed up with HEARTFELT CREATIONS to show how well their products compliment our chippies! so, it means - double inspiration for you! 

"#PINK #PARTY"


i chose this picture of ELISE and WILLY because they both look so happy on it and so PINK!

hence my title - i used my favourite CREATIVE EMBELLISHMENTS chipboard set social hash tags. i covered the chippies with a layer of gesso and when the gesso was dry, i heat embossed them with a pink embossing powder from SPARKLE N SPRINKLE.


 for my layout i used WEBSTER'S PAGES modern romance collection. i added the zig-zag borders from the chevron border / background chipboard set to use them as a basis for my flowers and the rest of the embellishments.

i die cut the branches using SPELLBINDERS cherry blossoms die and brown cardstock.


 to create the pink blossoms i used HEARTFELT CREATIONS’ HCD 742 majestic blooms die and HCPC 3577 vintage morning background precut set.

i stamped the flowers with VERSAMARK ink on pink cardstock and heat embossed them using SNS EP298 white detail embossing powder. for the flower centers i used pink gala glitz - this is a combination of glass glitter, two sizes of beads, and glass shards, and it look perfect on flowers!


for the pink pearly swirls i used ZVA creative pink pearly swirl, which a divided in few parts in order to fit my design better.


for the foliage i used HEARTFELT CREATIONS' HCPC3545 open leaf precut set and HCD736 classic leaf die.


if you are curious what the rest of the design teams did with their products, make sure to check out HEARTFELT CREATIONS' blog and CREATIVE EMBELLISHMENTS' blog.
there is a lot of eye candy and detailed project description on both blogs!

have a creative week! 

hugs 'n smiles,


Monday, September 22

DIE-VERSIONS + GREAT IMPRESSIONS: a blog hop

hello crafty peeps!

and WELCOME to the DIE-VERSIONS and GREAT IMPRESSIONS designers' blog hop!


we've got both talented teams hopping today with a chance to win prizes from both of these craft suppliers! 

our theme for this hop is "TIS THE SEASON" so get ready to see some beautiful holiday creations! 

you should have arrived here from kendra sand's blog and your next stop is katy drogos's blog. if you haven't and would like to hop with us, please go back to the DIE-VERSIONS' blog to see the entire hop list and to start at the beginning for the maximum chances to win! 

there will be two lucky winners – DIE-VERSIONS and GREAT IMPRESSIONS are each giving away one $25 GIFT CARD! 

PLEASE make sure that you leave a comment on every post in the hop, too. we all like to get feedback, right?! :-) plus - the more you comment, the more chances you have of winning! 

and here is what i came up with:


to create my card i used dark blue and white cardstock, and various pattern papers. i punched the edges of some of my layers and adhered them with mounting tape to the card base.

for the cute train i used the GREAT IMPRESSIONS' train delivery rubber stamp. i stamped the image on white pearly cardstock, fussy cut it and coloured only the heart red.


i cut the REMEMBER frame using DIE-VERSIONS' sweet frame "REMEMBER" die and dark blue cardstock. to give more glimmer and galm to my card, i added glitter glue to the frame.


i hope i managed to inpire you today!

THANKS for stopping by! 

we hope you're inspired all along the way, and that you grab all the goodies used from the DIE-VERSIONS and GREAT IMPRESSIONS stores! 

have FUN hopping!

 hugs 'n smiles,

Sunday, September 14

YOU & ME {merly impressions & kaisercraft}

hello crafty friends!

i've got a brand new layout to share with you today - 

"YOU & ME"


i really loved working with this sketch! it has all the best elements to create a fabulous layout!

the SOMETHING BLUE paper line is wedding themed, but i decided to use a picture of my hubby and me, still taken on a wedding, but not ours. we were invited to be first witnesses to my best friends wedding and this is one of the pictures we made on this day.

to create my layout i started with black pattern paper – mr & mrs. i drew the white frame along its edge and added the pre-punched sweet love pattern paper on top. i used MARTHA STEWART "cherish" punch-around-the-edge set. 


 i added different pattern paper layers under my picture to create a better visual spot for it. i used the mini paper pad from the same collection.


instead of a second pictures, as it is shown on the original sketch, i decided to add some of the lovely die cuts from the collectables pack matching this collection. i used RANGER liquid pearls - white opal and black onyx - to decorate most of them. 

then i adhered them onto my background using mounting foam tape.


to decorate my layout further i used KAISERCRAFT ribbon roses ivory, mini paper blooms coconut and mini paper blooms black. i die cut the foliage using pattern paper and various dies from MARIANNE DESIGN.


i drew the swirly design on the background paper using LIQUID PEARLS black onyx. for the spatters i used TATTERED ANGELS glimmer glaze oil slick. the pretty white lace is also from KAISERCRAFT lace pack - white.


to finish off my design i added KAISERCRAFT black rhinestones


i hope you enjoyed today's post!

and don’t forget you’ve got until 2nd of october, 2014 to add your creation to the gallery under the september challenge post. we will then choose our favourite layout to win a fantastic prize – a £25.00 voucher to spend on anything you want from the MERLY IMPRESSIONS online store!

have a fabulous day!

hugs 'n smiles,

Friday, September 5

tis the season to sparkle {SPARKLE 'n SPRINKLE}

hello sparkly friends!

today i've got a brand new sparkly creations to share – 

"TIS THE SEASON TO SPARKLE" 

i used 13.5 x 13.5 cm red card base and i added a 13 x 13 cm white cardstock layer on top. i ruffled its edges for more distressed look. for my third and final layer i used red festive pattern paper – 12.5 x 12.5 cm.


 to create the CHRISTMAS ornaments i used SNS nesties – ORNAMENTS – stamp set #418. i stamped the ornaments on a white cardstock using VERSAMARK ink and then heat embossed them with SNS gold detail embossing powder [EP168].


 to add extra color to the CHRISTMAS ornaments i used SNS fire engine red glitter [G1007] and Diamond Dust [G1116]. then i adhered the ready images to my background using scrapbook adhesives – 3D foam squares


THANK YOU for stopping by today!

have a great weekend!

hugs 'n smiles,

a season to sparkle {SPARKLE N SPRINKLE}

hello crafty friends!

i've got a brand new sparkly creations to share with you today - 
 

i used 13.5 x 13.5 cm red card base and i added a 13 x 13 cm white cardstock layer on top of it. before gluing it, i ruffled its edges for more distressed look. for my third and final layer i used pattern paper panel – 12.5 x 12.5 cm.


to create the CHRISTMAS ornaments i used SNS nesties – ornaments – stamp set #418. I stamped the ornaments on a white cardstock using VERSAMARK ink and then heat embossed them with SNS gold detail embossing powder [EP168].


to add extra color to the CHRISTMAS ornaments i used SNS fire engine red glitter [G1007] and diamond dust [G1116]. then i adhered the ready images to my background using scrapbook adhesives – 3D foam squares – variety pack – white


i hope you enjoyed today's post!

have a lovely weekend! 

hugs 'n smiles,